 Today for lunch I decided to try out the recipe for Corn Dogs from Hillbilly Housewife. They came out wonderful! Sorry ya'll that is not my picture of my corn dogs....they did not stick around long enough for me to snap a pic.
Saturday, July 11, 2009
What'cha Cooking: Hot Dog!...Corn Dog That Is!
 Today for lunch I decided to try out the recipe for Corn Dogs from Hillbilly Housewife. They came out wonderful! Sorry ya'll that is not my picture of my corn dogs....they did not stick around long enough for me to snap a pic.
Friday, July 10, 2009
Thrift Store Find
 I found this wonderful chair at my neighborhood thrift store...I was so happy to find it because I was in need of a nice chair for my daughters desk that I purchased on craigslist.
They had an array of chairs but none of them spoke to my heart until I saw this one and it said "I am the one you're looking for!" the chair looks a lot wider in the picture then it is in person.
 Here is a close up of the detail of the chair I just love the lines on this little chair it is so feminine.


Don't cha just think that it was made to go with the desk?
In My Nest: My Sweet Little Girls Room
 I have been really busy around the nest this week....painting and spray painting and more painting! I am so done with painting that I don't want to see another paint brush or can of spray paint for months!!!!
Oh but I must endure some more spray paint in the name of decorating my bookshelf (I'll tell ya'll more about this in another post).
I am so happy to be finished with the children's room and I am so happy with the results...I just love my daughters room...ohhh but I also sooo love my son's room (I better take pictures before they destroy it!).
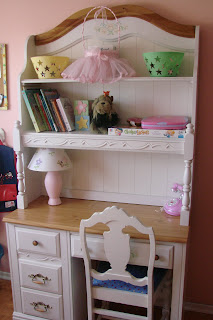
Here are a few pics of my daughters room .....Thanks so much for taking a look and God Bless Ya'll!
What'cha Cookin?: Peanut Butter Fudge

Sunday, July 5, 2009
"Around The Kitchen"....Making Sourdough Starter
 I have been thoroughly enjoying Candy's Blog and I had decided to take the chance in starting my own Sourdough Starter.
I started my Sourdough Starter on Tuesday and unfortunately I did not take any pics of it but I have tried to take pics of the process.
Simple Recipe Sourdough Starter
- A plastic container (not metal, it may react with the active Sourdough) wash and clean thoroughly.
- Add one cup of wheat or white flour and one cup of spring water. You can use tap but you have to be sure that there is no chlorine in the water.
- Stir all together and cover with a clean Floursack Cloth
or some other sort of clean cloth and secure it on top of the container using a rubber band - Place in a warm place in your kitchen away from any sort of contaminants
- Continue to add 1 cup of flour and 1 cup of spring water for 7 days and put it back into it's safe warm spot. On the 7th day you can try to bake some Sourdough bread using your new homemade Sourdough Starter.
- Put in the fridge on the 7th day and continue to feed once a week. Make sure to wash your container when you think it is time for a washing...you can just transfer you Sourdough Starter to another container and then transfer back into it's clean container when you have washed it.
Here are some of the pics I have taken of my Sourdough Starter
 This is how the Sourdough Starter looked on the 2nd day of sitting on my counter
 This is what the Sourdough Starter looked like after adding another cup of wheat flour and water and stirring it all in....notice the bubble (this is what you want to see in your starter) I read.
 This is my Sourdough Starter on it's sixth day...I had continually added 1 cup of water and 1 cup of wheat flour everyday (except for one day I missed). You can see some "hooch" (liquid) in the Sourdough Starter. My Sourdough Starter has been quite bubbly and at this point it has a very unpleasant smell. (that is normal) I read!
 This is what my Sourdough Starter looked like when I took off the Floursack Cloth
 This is my Sourdough Starter all mixed up after adding more wheat flour and water to it. I sat it back on the counter in it's little spot and come Tuesday (God Willing) I will attempt my 1st batch of Sourdough Bread......shoot any sort of baked bread in the oven for that matter!
"From Scratch Saturdays"...Baby Wipes
 I'm sorry about the late post but my Internet was not working after we switched providers but without any further ado..here is this weeks "From Scratch Saturdays" project...Homemade Baby Wipes!
•Place one of the halved rolls vertically into an empty and thoroughly cleaned one-gallon ice cream bucket. In a large measuring pitcher, mix two cups water, two tablespoons baby oil, and one tablespoon rubbing alcohol (some families also like to add a tablespoon of baby bath).
•Pour the liquid over the halved roll of paper towels in the ice cream bucket, and soak for 30 minutes. Remove the cardboard center. Feed the top corner of the paper towels through an X-shaped slit you've cut in the lid of the ice-cream bucket so you can pull out and tear off one “wipe” at a time."
God Bless Ya'll!
Saturday, June 27, 2009
From Scratch Saturday's...Homemade Yogurt, Deordorant & Ice Coffee

Ohhhh was I pleased in the way it turned out! It was my first time ever making yogurt and I plan on doing it again very soon (it is running out fast!).
I used the recipe from Candy over at My Blessed Home...she has so many wonderful ideas and recipes over at her blog. I also used her recipe for homemade deodorant.
My youngest daughter was in need of some deodorant and I was not about to purchase that toxic stuff they sell in the stores...so I thought why not give Candy's recipe a try.
I can't believe that I have been on occasion spending up to $2 buck on a cup of Ice Coffee that is actually one cup of coffee that looks like a large!
Well I will choke it up to the novelty of it....but uhmm that novelty has faded....and I enjoy my Homemade Ice Coffee so much better and I enjoy the price too!


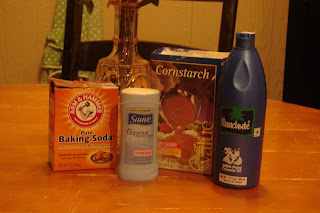
Simple Household Ingredients
1/4 Cup of Baking Soda
1/4 Cup of Corn Starch
A Few Tablespoons Of 100 % Coconut Oil
Mix dry ingredients first and then add Coconut Oil and make into the consistency of the store bought stuff...and then stuff into an old (washed out) deodorant bottle.
*Thanks Candy! The yogurt is deelish! The small half empty mason jar is the jar that I used to make individual servings with fruit. The children just about ate up those jars.

 My Large Ice Coffee...I also like to make a French Vanilla Ice Coffee as well! It's as easy as PIE!


